Collaborative Software Development
This page gives guidance for all developers on the project.
Note
Many details here are targeted at members of the IDAES project team. However, we strongly believe in the importance of transparency in the project’s software practices and approaches. Also, understanding how we develop the software internally should be generally useful to understand the review process to expect for external contributors.
Although the main focus of this project is developing open source software (OSS), it is also true that some of the software may be developed internally or in coordination with industry under a CRADA or NDA.
It is the developer’s responsibility, for a given development effort, to keep in mind what role you must assume and thus which set of procedures must be followed.
- CRADA/NDA
If you are developing software covered by a CRADA, NDA, or other legal agreement that does not explicitly allow the data and/or code to be released as open-source under the IDAES license, then you must follow procedures under Developing Software with Proprietary Content.
- Internal
If you are developing non-CRADA/NDA software, which is not intended to be part of the core framework or (ever) released as open-source then follow procedures under Developing Software for Internal Use.
- Core/open-source
If you are developing software with no proprietary data or code, which is intended to be released as open-source with the core framework, then follow procedures under Developing software for Open-source Release.
Developing Software with Proprietary Content
Proprietary content is not currently being kept on Github, or any other collaborative version control platform. When this changes, this section will be updated.
Developing Software for Internal Use
Software for internal use should be developed in the workspace repository of the
IDAES github organization. The requirements for reviews and testing of this code are
not as strict as for the idaes-dev repository, but otherwise the procedures are
the same as outlined for open-source development.
Developing software for Open-source Release
We can break the software development process into five distinct phases, illustrated in Figure 1 and summarized below:
1. Setup: Prepare your local system for collaborative development |
2. Initiate: Notify collaborators of intent to make some changes |
3. Develop: Make local changes |
4. Collaborate: Push the changes to Github, get feedback and merge |
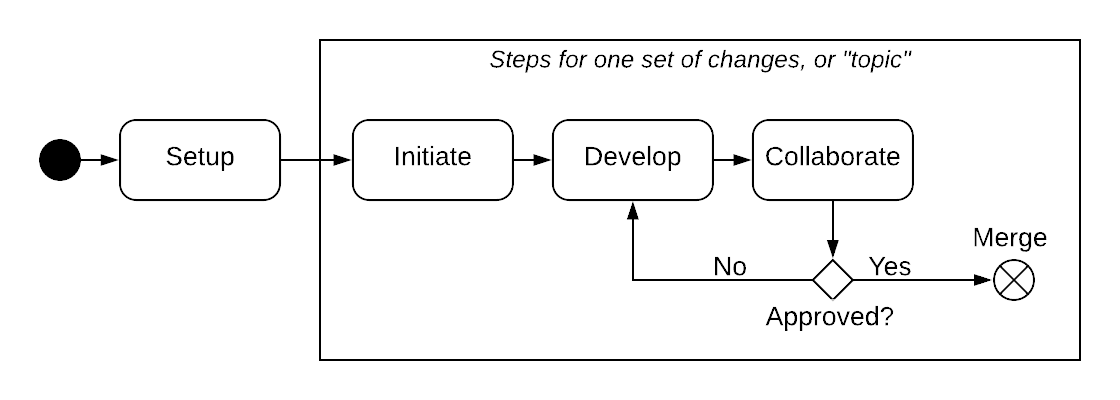
Figure 1. Overview of software development workflow
The rest of this page describes the what and how of each of these phases.
1. Setup
Before you can start developing software collaboratively, you need to make sure you are set up in Github and set up your local development environment.
Github setup
To work within the project, you need to create a login on Github. You also need to make sure that this login has been added to the IDAES organization by contacting one of the core developers.
If these steps are successful, you should be able to login to Github, visit the IDAES Github organization, and see “Private” repositories such as idaes-dev and workspace.
Fork the repo
You use a “fork” of a repository (or “repo” for short) to create a space where you can save changes without directly affecting the main repository. Then, as we will see, you request that these changes be incorporated (after review).
This section assumes that the repository in question is idaes-dev,
but the idea is the same for any other repo.
You should first visit the repo on Github by pointing your browser to https://github.com/IDAES/idaes-dev/. Then you should fork the repo into a repo of the same name under your name.
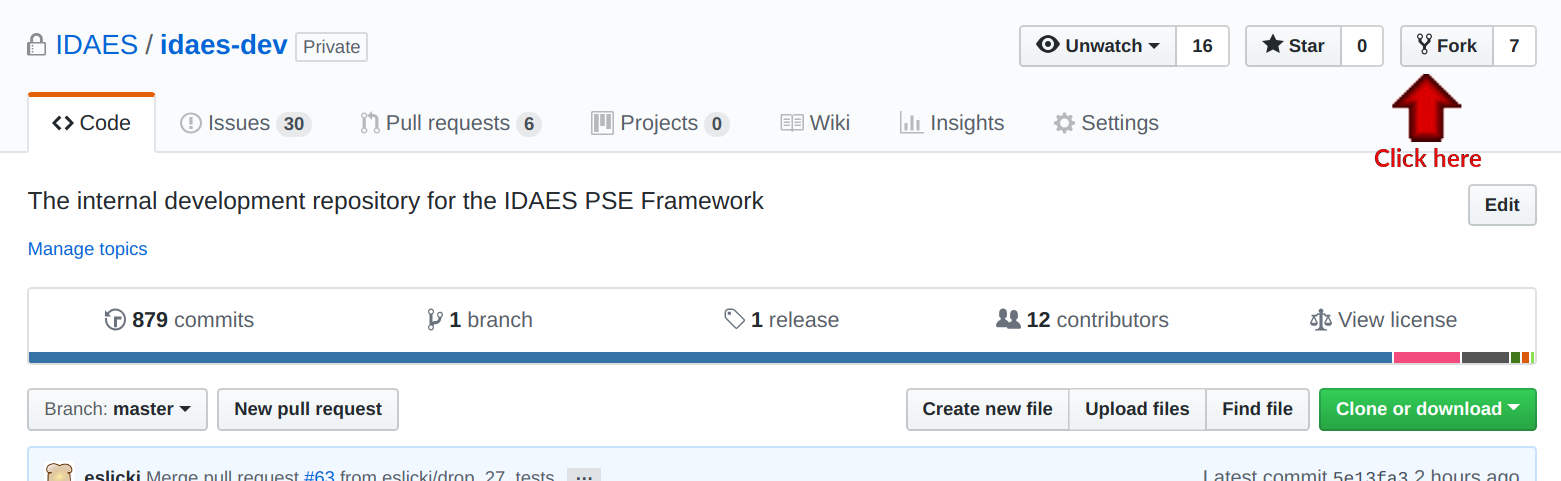
Figure 2. Screenshot showing where to click to fork the Github repo
Clone your fork
A “clone” is a copy of a Github repository on your local machine. This is what you need to do in order to actually edit and change the files. To make a clone of the fork you created in the previous step, change to a directory where you want to put the source code and run the command:
git clone git@github.com:MYNAME/idaes-dev.git
cd idaes-dev
Of course, replace MYNAME with your login name. This will download all the files in the latest version of the repository onto your local disk.
Note
After the git clone, subsequent git commands should be performed from
the “idaes-dev” directory.
Add upstream remote
In order to guarantee that your fork can be synchronized with the “main” idaes-dev repo in the Github IDAES organization, you need to add a pointer to that repository as a remote. This repository is called upstream (changes made there by the whole team flow down to your fork), so we will use that name for it in our command:
git remote add upstream git@github.com:IDAES/idaes-dev.git
Create the Python environment
Once you have the repo cloned, you can change into that directory (by default, it will be called “idaes-dev” like the repo) and install the Python packages.
But before you do that, you need to get the Python package manager fully up and running. We use a Python packaging system called Conda. Below are instructions for installing a minimal version of Conda, called Miniconda. The full version installs a large number of scientific analysis and visualization libraries that are not required by the IDAES framework.
wget https://repo.anaconda.com/miniconda/Miniconda3-latest-Linux-x86_64.sh
bash Miniconda3-latest-Linux-x86_64.sh
Create and activate a conda environment (along with its own copy of pip)
for the new IDAES installation (you will need to conda activate idaes
when you open a fresh terminal window and wish to use IDAES):
conda create -n idaes pip
conda activate idaes
Now that conda and pip are installed, and you are in the “idaes” conda environment, you can run the standard steps for installing a Python package in development mode:
pip install -r requirements.txt
python setup.py develop
You can test that everything is installed properly by running the tests with Pytest:
pytest
2. Initiate
We will call a set of changes that belong together, e.g. because they depend on each other to work, a “topic”. This section describes how to start work on a new topic. The workflow for initiating a topic is shown in Figure 3 below.
Figure 3. Initiate topic workflow
Create an issue on Github
To create an issue on Github, simply navigate to the repository page and click on the “Issues” tab. Then click on the “Issues” button and fill in a title and brief description of the issue. You do not need to list details about sub-steps required for the issue, as this sort of information is better put in the (related) pull request that you will create later. Assign the issue to the appropriate people, which is often yourself.
There is one more important step to take, that will allow the rest of the project to easily notice your issue: add the issue to the “Priorities” project. The screenshot below shows where you need to click to do this.
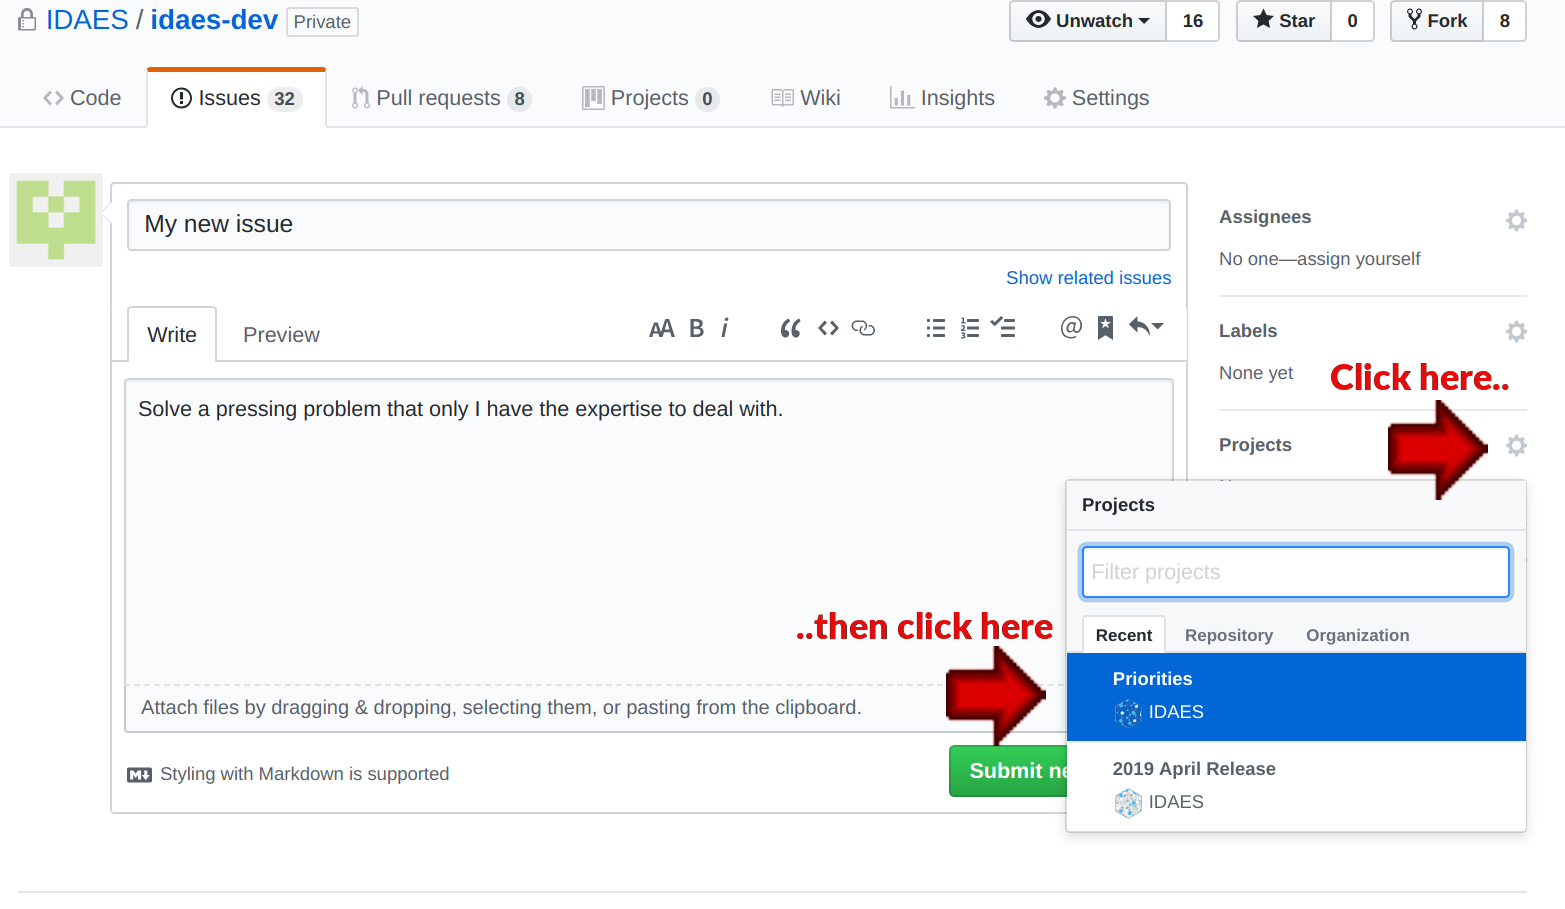
Figure 4. Screenshot for creating an issue on Github
Create a branch on your fork
It is certainly possible to do your work on your fork in the “main” branch. The problem that can arise here is if you need to do two unrelated things at the same time, for example working on a new feature and fixing a bug in the current code. This can be quite tricky to manage as a single set of changes, but very easy to handle by putting each new set of changes in its own branch, which we call a topic branch. When all the changes in the branch are done and merged, you can delete it both locally and in your fork so you don’t end up with a bunch of old branches cluttering up your git history.
The command for doing this is simple:
git checkout -b <BRANCH-NAME>
The branch name should be one word, with dashes or underscores as needed.
One convention for the name that can be helpful is to include the Issue number
at the end, e.g. git co -b mytopic-issue42. This is especially useful later
when you are cleaning up old branches, and you can quickly see which branches
are related to issues that are completed.
Make local edits and push changes
A new branch, while it feels like a change, is not really a change in the eyes of Git or Github, and by itself will not allow you to start a new pull request (which is the goal of this whole phase). The easiest thing to do is a special “empty” commit:
git commit --allow-empty -m 'Empty commit so I can open a PR'
Since this is your first “push” to this branch, you are going to need to set an upstream
branch on the remote that should receive the changes. If this sounds complicated,
it’s OK because git actually gives you cut-and-paste instructions. Just run
the git push command with no other arguments:
$ git push
fatal: The current branch mybranch-issue3000 has no upstream branch.
To push the current branch and set the remote as upstream, use

    git push --set-upstream origin mybranch-issue3000
Cut and paste the suggested command, and you’re ready to go. Subsequent calls to “push” will not require any additional arguments to work.
Start a new Pull Request on Github
Finally, you are ready to initiate the pull request. Right after you perform the
push command above, head to the repository
URL in Github (https://github.com/IDAES/idaes-dev) and you should see a highlighted
bar below the tabs, as in Figure 5 below, asking if you want to start a pull-request.
Figure 5. Screenshot for starting a Pull Request on Github
Click on this and fill in the requested information. Remember to link to the issue you created earlier.
Depending on the Github plan, there may be a pull-down menu for creating the pull request that lets you create a “draft” pull request. If that is not present, you can signal this the old-fashioned way by adding “[WIP]” (for Work-in-Progress) at the beginning of the pull request title.
Either way, create the pull request. Do not assign reviewers until you are done making your changes (which is probably not now). This way the assigning of reviewers becomes an unambiguous signal that the PR is actually ready for review.
Note
Avoid having pull requests that take months to complete. It is better to divide up the work, even artificially, into a piece that can be reviewed and merged into the main repository within a week or two.
3. Develop
The development process is a loop of adding code, testing and debugging, and committing and pushing to Github. You may go through many (many!) iterations of this loop before the code is ready for review. This workflow is illustrated in Figure 6.
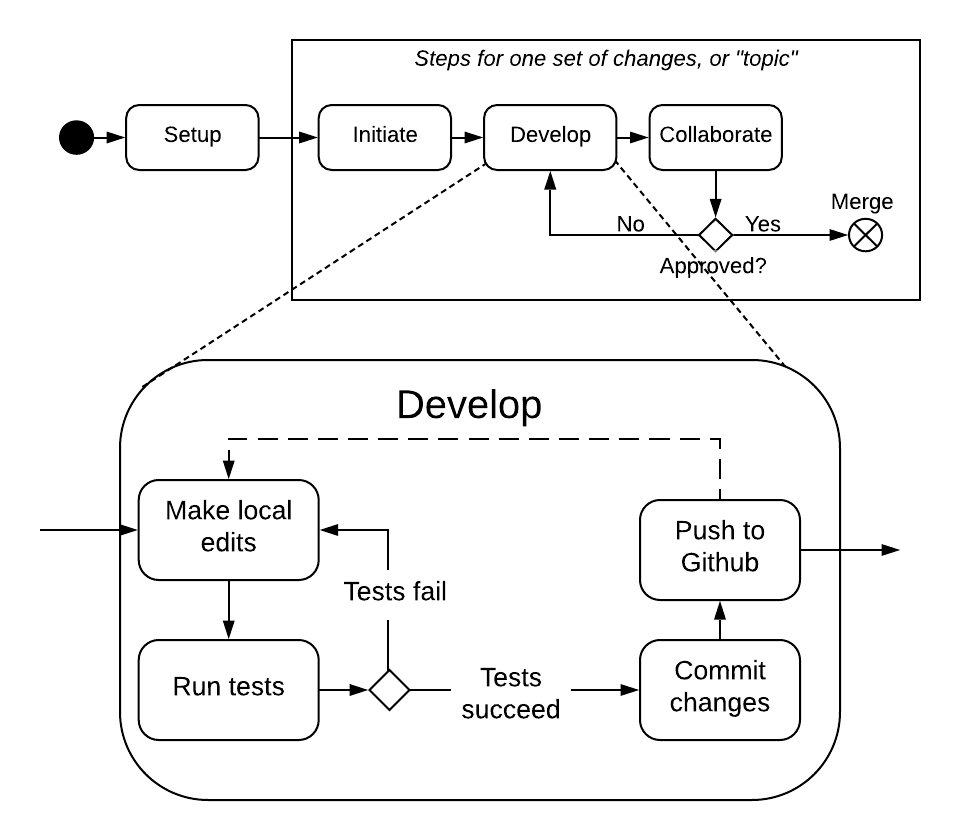
Figure 6. Software development workflow
Running tests
After significant edits, you should make sure you have tests for the new/changed functionality. This involves writing Unit tests as well as running the test suite and examining the results of the Code coverage.
This project uses Pytest to help with running the unit tests. From the top-level directory of the working tree, type:
pytest
Alternatively users of an IDE like PyCharm can run the tests from within the IDE.
Commit changes
The commands: git add, git status, and git commit are all used in combination to save a snapshot of a Git project’s current state. 1.
The commit command is the equivalent of “saving” your changes. But unlike editing a document, the set of changes may cover multiple files, including newly created files. To allow the user flexibility in specifying exactly which changes to save with each commit, the add command is used first to indicate files to “stage” for the next commit command. The status command is used to show the current status of the working tree.
A typical workflow goes like this:
$ ls
file1  file2
$ echo 'a' > file1 # edit existing file
$ echo '1' > file3 # create new file
$ git status --short # shows changed/unstaged and unknown file
 M file1
?? file3
$ git add file1 file3 # stage file1, file3 for commit
$ git status --short # M=modified, A=added
M  file1
A  file3
$ git commit -m "made some changes"
[main 067c16e] made some changes
2 files changed, 2 insertions(+)
create mode 100644 file3
Of course, in most IDEs you could use built-in commands for committing and adding files. The basic flow would be the same.
Synchronize with upstream changes
Hopefully you are not the only one on the team doing work, and therefore you should expect that the main repository may have new and changed content while you are in the process of working. To synchronize with the latest content from the “upstream” (IDAES organization) repository, you should periodically run one of the two following commands:
git pull
# OR -- explicit
git fetch --all
git merge upstream/main
You’ll notice that this merge command is using the name of the “upstream” remote that you created earlier.
Push changes to Github
Once changes are tested and committed, they need to be synchronized up to Github. This is done with the git push command, which typically takes no options (assuming you have set up your fork, etc., as described so far):
git push
The output of this command on the console should be an informative, if slightly cryptic, statement of how many changes were pushed and, at the bottom, the name of your remote fork and the local/remote branches (which should be the same). For example:
Counting objects: 5, done.
Delta compression using up to 8 threads.
Compressing objects: 100% (5/5), done.
Writing objects: 100% (5/5), 528 bytes | 528.00 KiB/s, done.
Total 5 (delta 4), reused 0 (delta 0)
remote: Resolving deltas: 100% (4/4), completed with 4 local objects.
To github.com:dangunter/idaes-dev.git
   d535552..fe61fcc  devdocs-issue65 -> devdocs-issue65
4. Collaborate
The collaboration phase of our journey, shown in Figure 7, is mostly about communicating what you did to the other developers. Through the Github “review” mechanism, people will be able to suggest changes and improvements. You can make changes to the code (other people can also make changes, see Shared forks), and then push those changes up into the same Pull Request. When you get enough approving reviews, the code is merged into the main repository. At this point, you can delete the “topic branch” used for the pull request, and go back to initiate your next set of changes.
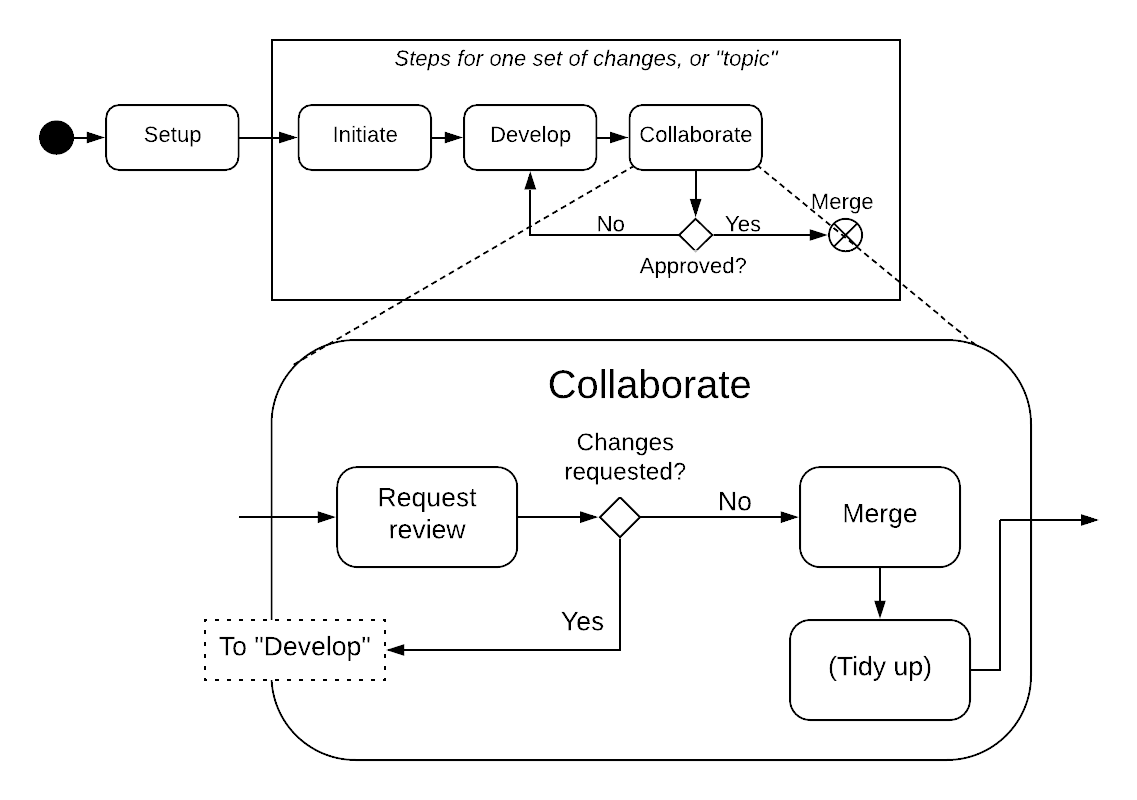
Figure 7. Collaborate phase workflow
Request review
To request review of a pull request, navigate to the pull request in the main (e.g., “idaes-dev”) repository and select some names in the “Reviewers” pull-down on the right-hand side. You need to have two approving reviews. The reviewers should get an email, but you can also “@” people in a comment in the pull request to give them a little extra nudge.
See the full code review procedure for more details.
Make changes
You need to keep track of the comments and reviews, and make changes accordingly. Think of a pull request as a discussion. Normally, the person who made the pull request will make any requested edits. Occasionally, it may make sense for one or more other developers to jump in and make edits too, so how to do this is covered in the sub-section below.
Changes made while the code is being reviewed use the normal Develop workflow.
Merge
Once all the tests pass and you have enough approving reviews, it’s time to merge the code! This is the easy part: go to the bottom of the Pull Request and hit the big green “merge” button.
Before you close the laptop and go down to the pub, you should tidy up. First, delete your local branch (you can also delete that branch on Github):
git checkout main # switch back to main branch
git branch -d mychanges-issue3000
Next, you should make sure your main reflects the current state of the upstream
main branch, i.e. go back and synchronize with the upstream remote,
i.e. run git pull.
Now you can go and enjoy a tasty beverage. Cheers!

Footnotes